In an effort to improve the https://alshowto.com website for non-logged in users; I went ahead an rebuilt the web server. Here is how I did it.
Run On Proxmox
All of my sites are currently ran on Proxmox servers. So I created a cloud image using my article Proxmox and Debian 12 Cloud Image. The end result of the image is ran in my DMZ zone and has HAProxy in front of it via pfSense router again running in Proxmox on its on vlan. I am not going to get into the specific of that setup. However you choose to server the website is irrelevant to this discussion. All I am going to say is that I choose this approach because it offlines all ssl to my pfSense since that is where the certs are stored and the HAProxy simply connects to http not https on my WordPress site. Personally I think this gives the best performance as it does not require Apache to have to deal with SSL certs at all.
Install Docker and Portainer
I like Portainer for this, So follow my article on how I installed my latest Docker and Portainer. Then once Portainer is configured it is time to log in there and create a stack. Here is the docker-compose.yaml I ran into Portainer
services:
  db:
    # We use a mariadb image which supports both amd64 & arm64 architecture
    image: mariadb:10.6.4-focal
    # If you really want to use MySQL, uncomment the following line
    #image: mysql:8.0.27
    command: '--default-authentication-plugin=mysql_native_password'
    volumes:
      - db_data:/var/lib/mysql
    restart: always
    environment:
      - MYSQL_ROOT_PASSWORD=$MYSQL_ROOT_PASSWORD
      - MYSQL_DATABASE=wordpress
      - MYSQL_USER=wordpress
      - MYSQL_PASSWORD=$WORDPRESS_DB_PASSWORD
    expose:
      - 3306
      - 33060
  wordpress:
    image: wordpress:latest
    volumes:
      - /opt/wordpress:/var/www/html
      - /opt/wordpress/php.d/custom.ini:/usr/local/etc/php/conf.d/custom.ini
    ports:
      - 80:80
    restart: always
    environment:
      - WORDPRESS_DB_HOST=db
      - WORDPRESS_DB_USER=wordpress
      - WORDPRESS_DB_PASSWORD=$WORDPRESS_DB_PASSWORD
      - WORDPRESS_DB_NAME=wordpress
volumes:
  db_data:
I used environment variables to define key passwords for DB as shown above.
WordPress and PHP Configuration
PHP Config – custom.ini
As the not above, /opt/wordpress/php.d/custom.ini -> /usr/local/etc/php/conf.d/custom.ini. So, that is where all my custom settings for PHP goes.
Here is how I came up with that setup.
Here is the custom.ini settings as I currently have them:
upload_max_filesize = 6G
post_max_size = 6G
max_execution_time = 600
max_input_time = 600
memory_limit = 512M
max_memory_limit = 1G
This all configs are under /opt/wordpress as shown in above mounts so that is where all the rest of the configuration will reside for my WordPress.
WordPress Config – wp-config.php
Now to setup WordPress, I choose to simply modify the wp-config.php file directly. Yes, there is a better way to do it as outlined here on WordPress Docker page. However, I did not want to mess with it since it was only a few lines anyway.
so this is the part of the wp-config.php file that I changed. Notice the comments state change from here to here in the config file. So, that is where this change lives in the config file.
Here is a spinet of the changed items in my config file:
/* Add any custom values between this line and the "stop editing" line. */

// Single-Site (serves any hostname)
// For Multi-Site, see: https://www.turnkeylinux.org/docs/wordpress/multisite
define('WP_SITEURL', 'https://alshowto.com');
define('WP_HOME', 'https://alshowto.com');

/** Make sure WordPress understands it's behind an SSL terminator */
define('FORCE_SSL_ADMIN', true);
define('FORCE_SSL_LOGIN', true);

// If we're behind a proxy server and using HTTPS, we need to alert WordPress of that fact
// see also https://wordpress.org/support/article/administration-over-ssl/#using-a-reverse-proxy
if (isset($_SERVER['HTTP_X_FORWARDED_PROTO']) && strpos($_SERVER['HTTP_X_FORWARDED_PROTO'], 'https') !== false) {
        $_SERVER['HTTPS'] = 'on';
}
// (we include this by default because reverse proxying is extremely common in container environments)

// Code for showing correct client IP address
if ( isset( $_SERVER['HTTP_X_FORWARDED_FOR'] ) ) {
    $mte_xffaddrs = explode( ',', $_SERVER['HTTP_X_FORWARDED_FOR'] );
    $_SERVER['REMOTE_ADDR'] = $mte_xffaddrs[0];
}


if ($configExtra = getenv_docker('WORDPRESS_CONFIG_EXTRA', '')) {
        eval($configExtra);
}

/* That's all, stop editing! Happy publishing. */
That is the basics of what I had to do to get this site configured to move to my new Docker containerd website.
Migrating Web Server Content
I simply used the built in WordPress Exporter and Importer. It worked great! The only problem I had was I had to move my old web server to a publicly available URL. Then, I could import all the images and other content that I had for my posts. So, that was a little bit of a pain and I would recommend setting up your new web server temporarily to a different domain so that you do not have to mess with re-configuring your old web server to a new temp domain so that all the contents can be extracted. Or move the content to new web server before making any changes to wp-config.php so that the old server stays up and continues to server your content while the new one copies over the content. This copy took over 30 minutes.
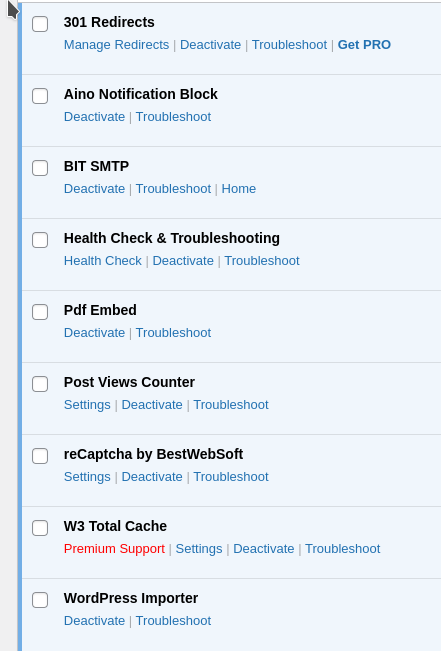
My Plugins
I went minimalist on plugins at this point. My old site broke for some reason and that is usually from a plugin. So, to prevent that issue. I only brought in the critical plugins at this point. I may have to add a few more but for now I am going to keep it simple and see how it goes.